Filters
Access: Users assigned the Staffing Dashboard - Read Only and Staffing Dashboard - Action Capable roles may access and view the Staffing Dashboard.
When a user accesses the Staffing Dashboard, the default view displays the current Shift Summary staffing data for the facilities, service lines, and departments to which the user has access. Dashboard users can
change the displayed data by clicking the Filters button displayed above the dashboard.
Staffing Dashboard Filter Options
Filter options are determined by the user’s assigned access and permissions. Only those facilities, service lines, and/or departments to which the user has access are available for selection.
To filter staffing dashboard data:
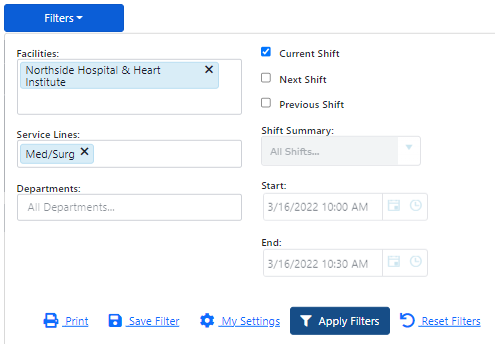
- Select from the following filter options:
- Facilities – Select a facility. If left blank, all facilities to which the user has access are returned.
- Service Lines – Select a service line. If left blank, all service lines to which the user has access are returned.
- Departments – Select a department. If left blank all departments to which the user has access are returned.
- Current Shift (default) – displays shift summaries that overlap the current time.
- Next Shift – displays the next scheduled shift summary period.
- Shift Summary – allows the user to select a specific shift summary period.
Note: The Shift Summary, Start and End options are disabled if either the Current or Next Shift options are selected.
- The default option is All Shifts which returns staffing results for all summary periods within the selected date and time range. This option allows staffers to view staffing levels for all summary periods within
a shift.
- The user may also select a specific shift summary period from the drop-down list.
- Start and End – Click the calendar and clock icons to enter a date and time range.
- Users may enter future dates for proactive staffing management or dates in the past to view historical trends and patterns.
- Click Apply Filters to view selected data.
- Click Save Filters to add the search criteria to your personal list of filters.
- Filters save with generic filter names, but can be edited and deleted by clicking the My Settings link on the Filters screen or the Preferences icon
 in the dashboard header.
- Saved filters are accessed from the drop-down list displayed next to the blue Filters button in the dashboard header.
- Click Reset Filters to return to the default dashboard view.
-
Pro Tip: To view all summary periods in a specific shift:
1. Deselect Current Shift and/or Next Shift.
2. Set Shift Summary to All Shifts.
3. Enter the shift date and time range.
4. Select the Facility, Service Line, and/or Department.
5. Click
Apply Filters.
The shift summary periods for the selected date display grouped by department.
Additional Information
Dashboard - Overview
Dashboard - Navigation
Dashboard - Viewing Staff Levels